Internal Jugular Central Venous Line
INDICATIONS
- Central venous access for infusion of vasoactive drugs, TPN, high dose KCl, etc.
- Hemorrhagic disorder where large volumes blood/blood products needed
- Measurement of central venous pressure
- Need for frequent blood draws where peripheral access limited.
- Lack of peripheral venous access
CONTRAINDICATIONS
- Severe coagulopathy; INR > 1.5-1.6; platelets < 50 K (relative contraindication). The femoral or IJ site is preferred with a coagulopathy or anticoagulation due to the ability to compress the vein in the event of serious hemorrhage.
- Infected skin site
- In patients with higher risks for pneumothorax or inability to tolerate pneumothorax, the IJ or femoral sites may also be preferred.
- Thrombosis of target vein
RISKS
The risk of complications of central line placement varies with the experience of the operator and the conditions (emergency vs. elective) under which the line is placed. Nonetheless, some general statements can be made and used when obtaining consent from a patient. Risks associated with central venous catheterization include infectious, mechanical, and thrombotic complications. A chest radiograph should be obtained to confirmplacement and to assess for complications.
Infectious Complications
Catheter infections occur by means of one of three mechanisms: local insertion siteinfection, which travels down the catheter externally; or hub colonization followed by infection via the intralumenal route or via hematogenous seeding of the catheter.
The Institute for Healthcare Improvement recommends five steps to reduce central-line infections: hand hygiene, adherence to maximal barrier precautions, chlorhexidine skin antisepsis, selection of an optimal catheter site, and daily review
of the necessity of the catheter, with prompt removal when the catheter is no
longer needed. Implementation of these steps has been conclusively shown to decrease
the rate of catheter-related bloodstream infection. Scheduled changing of
a catheter over a guide wire or moving a catheter to a new site can increase mechanical
and infectious complications, and neither is recommended. Antiseptic containing
hubs and antimicrobial-impregnated catheters have been shown to decrease
the rate of catheter-related bloodstream infections. Topical antibiotic
ointments are ineffective, promote antibiotic-resistant bacteria, and increase fungal
colonization.
Mechanical Complications
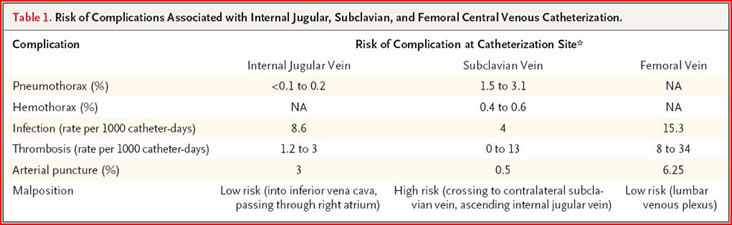
Mechanical complications include arterial puncture, hematoma, pneumothorax, hemothorax,arrhythmia, and improper location of the catheter, whether in an accessory vein or in the other vessels of the upper vascular system. Insertion of a catheter
into the femoral vein, not shown in this video, has the highest risk of mechanical
complications, but the rates of serious mechanical complications for femoral and
subclavian insertion are similar. If an artery is punctured, further attempts at that
site should be abandoned, and access to an alternative site should be attempted.
Internal jugular and subclavian cannulation sites are preferred because of their
lower overall rate of mechanical complications. However, these sites carry a small
risk of hemothorax and pneumothorax. Ultrasound guidance for internal jugular
cannulation significantly reduces the number of attempts required and the risk of
complications.
Thrombotic Complications
Central venous cannulation increases the risk of central venous thrombosis, with the concomitant potential risk of venous thromboembolism. Thrombosis may occur
as early as the first day after cannulation. The site with the lowest risk for thrombotic
complications is the subclavian vein. Prompt removal of the catheter when
it is no longer needed decreases the risk of catheter-related thrombosis.
n engl j med 356;21 www.nejm.org may 24, 2007
INDWELLING CENTRAL VENOUS CATHETER REMOVAL GUIDELINES
- No specific time interval for changing or removal. Catheter site and need should be reassessed daily. If site becomes infected, removal and if needed, replace at a different site.
- If line is to be removed because of suspicion of a catheter-related infection, and the skin site is not infected-looking, guide wire exchange with blood cultures through the line and culture of the tip should be performed
- Catheter removal may not be required with coagulase-negative Staph line infection without infected skin site, but most other catheter related infections require removal and antibiotics.
PREP & ANESTHESIA
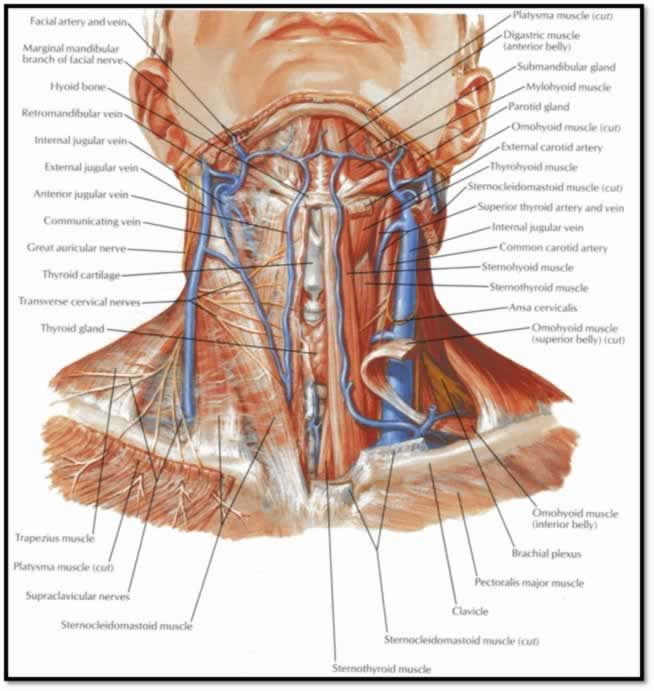
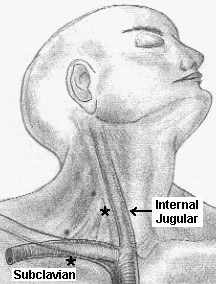
- Cleanse a 15-20 cm area over the side of the mid- to lower neck with povidone-iodine solution; the right side is preferred due to more direct line to the atrium and avoids injuring the thoracic duct. If you are using ultrasound guidance, do a quick look prior to preparing your sterile field to localize the IJ and its relationship to the carotid artery.
- The site of entry should be at the top of the triangle formed by the two heads of the sternocleidomastoid muscle and clavicle.
- Drape the patient with the provided paper/plastic drape with center cutout.
- Estimate the length of catheter to be placed to end up with tip above right atrium
- Using the 25 ga needle, make a wheal under the skin at the desired spot, and anesthetize the subcutaneous tissue
- Using the 20 ga needle, anesthetize deeper.
- Always pull back before injecting to avoid intravascular injection of lidocaine.
TECHNIQUE
- Place the guide wire, dilator, catheter, and scalpel on the sterile drape for easy reach when needed.
- Have the patient turn head in the opposite direction
- Using the 18 ga finder needle (largest needle in the kit) and a small syringe, enter the skin at the top of the jugular triangle. In obese patients where the landmarks are not discernable, a reasonable rule of thumb is to go three finger breadths lateral from the tracheal midline, and three finger breadths up from the clavicle.
- Alternatively use ultrasound guidance with the portable ultrasound in a sterile sleeve to localize the vein and follow your needle into its lumen.
- Ultrasound Guidance: In numerous studies, ultrasound guidance has been shown to increase the success of first-time catheter placement and to decrease the risk of complications. When using ultrasound guidance, enlist an assistant either to handle the probe or to remove it when it is no longer needed. The vein and artery appear circular and black on the ultrasound image; the vein is much more compressible when gentle pressure is applied to the skin via the probe. The needle appears echogenic and can be followed into the image of the vein
- Palpate for the carotid impulse an make sure you are lateral to this.
- Insert the needle at 30 degrees and aim for the ipsilateral nipple.
- Gradually advance the needle, always gently pulling back on the plunger as you progress; a flash and easy withdrawal of dark blood, this indicates entrance into the vein.
- If you bury the needle without blood, gradually withdraw; you may still get into the vein as you may have collapsed it on the way in.
- Once in the vessel, steady the needle and remove the syringe, holding a thumb over it to prevent air embolism.
- Insert j-tipped guide wire into needle; if resistance is felt do not force it.
- Watch monitor as guide wire is advanced. Ventricular ectopy indicates placement in RV, and guide wire should be pulled back a few cm.
- Holding guide wire, remove needle from skin.
- Make a small nick with the number 11 blade where wire enters skin.
- Advance dilator over guide wire with a twisting motion; there will be resistance.
- Remove dilator, holding guide wire and having some gauze 4x4 in your hand to apply pressure to a site that will now bleed after dilation.
- Place catheter over guide wire; it should advance easily. Hold guide wire at skin entrance and feed it back through distal port of central line (brown cap). When wire comes out, grab it at the end and finish advancing catheter.
- Remove guide wire and flush line through all 3 ports.
- Suture catheter in place via flange with holes. If more than a cm or 2 of catheter is exposed due to length, either suture the catheter down or use the snap-on flange provided in the kit.
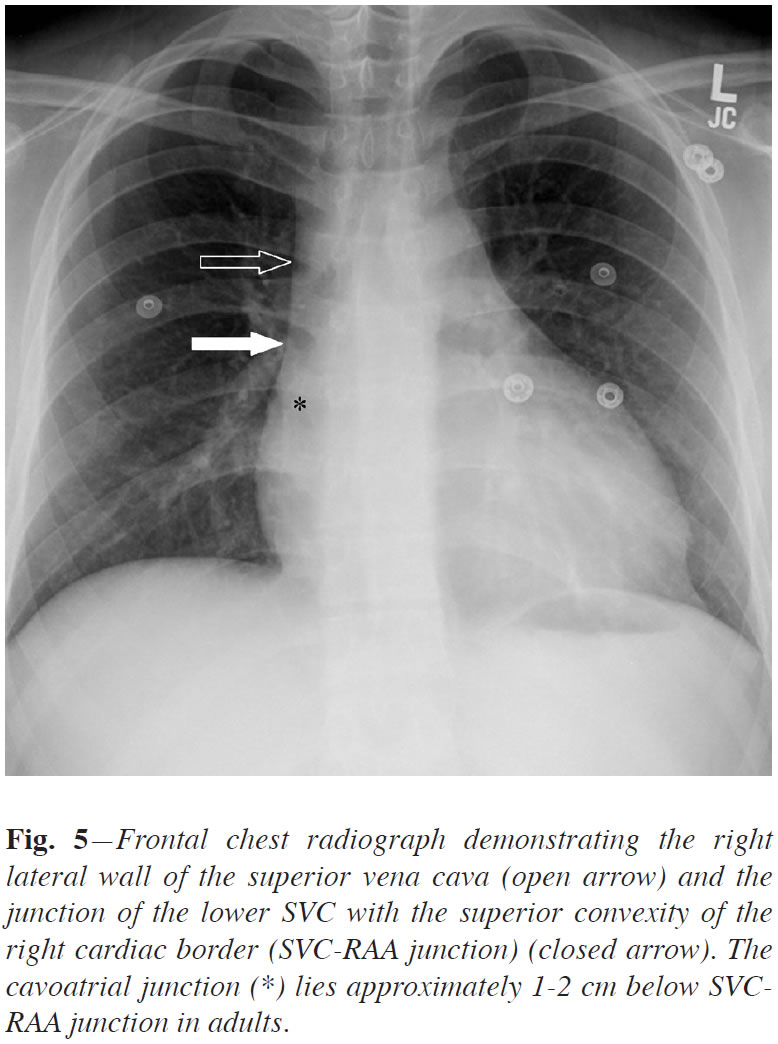
- Order a stat CXR to evaluate for line placement and complication. The tip of the catheter should be at the junction of the SVC and right atrium on chest xray. New data would suggest that this is 2cm below the superior right cardiac sillhouette which is made up by the right atrial appendage. (Verhey P.T., Gosselin M.V., Primack S.L., Blackburn P.L. and Kraemer A.C. (2008) The Right Mediastinal Border and Central Venous Anatomy of Frontal Chest Radiograph - Direct CT Correlation. Journal of the Association of Vascular Access. 13(1), p.32.) Advancement beyond this point can lead to arrythmia and unlikely myocardial perforation.