At birth, the inferior end of the spinal cord is opposite the body of the third lumbar vertebrae (L3). Distal to this point is the cauda equina and its nerve roots. As the child grows, the vertebral column grows much faster than the spinal cord itself, and by adulthood, the spinal cord only reaches the inferior border of the L1 vertebra, or the superior aspect of L2. Distal to this point is the cauda equina. In order to avoid transfixing the spinal cord during LP, the needle is placed distal to L2. This means the needle enters the subarachnoid space at the level of the mobile cauda equina.
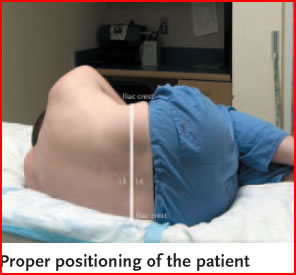
Landmarking the interspace is quite easy, as an imaginary line that crosses the lumbar region of the back joining the posterior superior iliac crests will cross the L3-L4 interspace. Thus, one can easily identify the L2-L3 (above the line), L3-L4(at the line), or L4-L5(below the line) interspaces, all of which are suitable for LP.
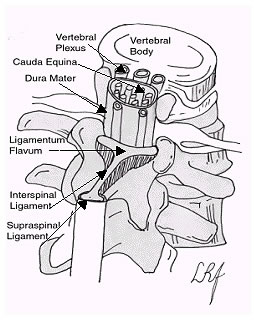
The CSF itself resides in the subarachnoid space between the pia mater and the arachnoid mater. In order to place the needle into the subarachnoid space, the needle passes between two vertebral processes and continues through the interspinal tissues and into the subarachnoid space. The tissues pierced are (in order): skin, subcutaneous tissue, supraspinal ligament, interspinal ligament, ligamentum flavum, dura mater, the arachnoid mater and into the subarachnoid space.
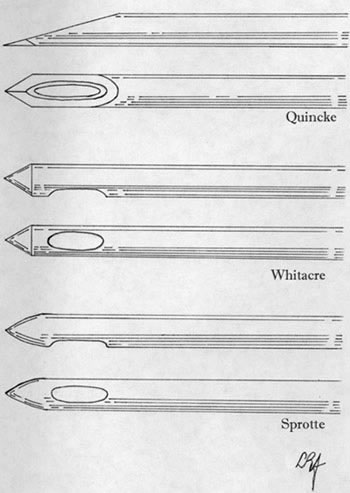
As mentioned previously, using smaller, atraumatic needles decreases the incidence of post lumbar puncture headache. If you have chosen to perform this method, you will need to add two pieces of equipment to your LP tray: a small gauge Sprotte or Whitacre needle (I often use a 24 gauge) and a regular 18 gauge needle (the type you draw up medications with). If you are using a 22g atraumatic needle, you probably don't need to follow these instructions. Add these to you LP tray before beginning your procedure. What you will immediately notice is the small gauge needles are very flexible. This can lead to difficulty in directing the LP needle as it tends to flex and bend while being advanced through the soft tissues. To solve this problem, you will use the 18 gauge needle as a "guide" for the smaller, more flexible LP needle.
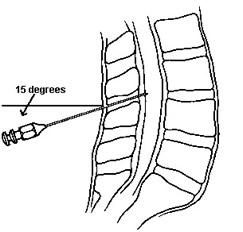
Begin the LP as you would normally, with positioning the patient, cleaning the sterile field, draping and anesthetizing the back. Once the patient is anesthetized, take your 18 gauge needle and place it between the two spinous processes as though you were using it as your LP needle (two thirds of the way caudal between the spinous processes, parallel to the bed and aimed at the umbilicus). Insert the needle up to its hub. The 18 gauge needle should feel firmly embedded in the ligaments when properly placed, yet it is too short to reach the spinal canal.
Now take your smaller LP needle and advance it through the 18 gauge needle. This guides the flexible LP needle towards the spinal canal while preventing it from bending. As with the regular LP, remove the stylet often as you advance, checking for CSF flow. You will often feel the 'pop' as you pass through the ligamentum flavum and dura mater signifying that you are in the correct space. Note that CSF flow will be slower due to the smaller needle, thus you will need a little more time for pressure measurement and CSF collection.
Study |
Normal Value |
Comment |
|---|---|---|
| Opening Pressure | 5-28 cm H2O | |
| Appearance | Crystal clear | Fluid may appear clear with as many as 400 cells/mm3 |
| Xanthochromia | None | |
| RBC's | 5 per mm3 | May be increased in traumatic tap |
| WBC's | 5 per mm3 | Exclusively lymphocytes and monocytes |
| Glucose | 60-70% of serum value or 2.2 - 3.9 mmol/L | |
| Protein | 0.2 - 0.45 g/L | Increased in disease states |
| Gram Stain and C&S | Negative |
Recall that opening pressure is measured at the start of your LP with the pressure manometer. This pressure is only valid in the lateral decubitus position. Increased opening pressures suggest increased intracranial pressures from a mass lesion (neoplasm, hemorrhage or cerebral edema), overproduction of CSF (choroid plexus papilloma) or a defective outflow mechanism through the ventricles.
Normal CSF is crystal clear in appearance, yet up to 400 cells/mm3 can reside in the CSF and the physician will not see changes in the clarity of the CSF. There are two major reasons for cloudy CSF. The first is the presence of large numbers of WBC's. In CSF infection the CSF can appear turbid as the number of WBC's increases. They accumulate to the point of making the CSF appear cloudy or it can even appear as pus. The second reason for CSF discoloration is due to red cells and their breakdown products. Large numbers of RBC's in the CSF can make the CSF appear very bloody. After the blood has been in the CSF for greater than 12 hours, the red cells begin to lyse in large quantities and the oxyhemoglobin and bilirubin cause a yellow orange discoloration of the CSF. This orange red discoloration is known as xanthochromia and can be measured in the lab by spectrographic analysis. Formation of the RBC breakdown products peaks about 24 hours after blood enters the CSF and resolves in 3 – 30 days. The presence of xanthochromia is always pathological.
Normal CSF is allowed to have up to 5 RBC's per mm3, albeit it is common to find no RBC's in the CSF. Levels higher than this suggests either SAH, intracranial bleed or traumatic tap. A traumatic tap occurs when the LP needle enters a blood vessel while performing the procedure. Traumatic taps commonly occur when the needle has advanced slightly too far and transfixed the internal vertebral plexus (the more densely packed area of vasculature on the ventral side of the spinal cord). Differentiating between traumatic tap and SAH is usually fairly easy. If you suspect a traumatic tap, order cell counts on test tubes one and three. As the CSF washes the needle, the blood will also be washed out and the number of RBC's should decrease. Also have the lab examine the CSF for xanthochromia. Because the traumatic tap is acute, there should be no xanthochromia. The presence of xanthochromia suggests there has been previous CSF bleeding.
The normal CSF contains up to 5 WBC's per mm3. These may be either lymphocytes or monocytes. If the CSF contains more than 5 WBC's or other cell lines, infection is likely. The most worrisome of these is acute bacterial meningitis. Bacterial meningitis displays a marked pleocytosis ranging between 500 and 20000 WBC/mm3. The differential of these cells demonstrates mostly neutrophils. Meningitis may also be caused by a variety of viruses. The CSF in these cases demonstrates 10 to 1000 WBC's per mm3 with a differential of mostly lymphocytes and monocytes.
CSF glucose is normally 60-70% of the serum values. Glucose enters the CSF by the choroid plexus or through active transport to in the capillary membranes. Low levels of glucose are commonly seen in CNS infection and are due to inhibition of the glucose active transport as well as increased utilization of glucose by the brain and spinal cord. Elevated glucose levels are usually inconsequential and suggest serum hyperglycemia.
| Bacterial meningitis | Chemical meningitis | Meningeal carcinomatosis |
| Tuberculous meningitis | Trichinosis | Sarcoidosis |
| Fungal meningitis | Syphilis | Cysticercosis |
| Mumps meningitis | Herpes encephalitis | Hypoglycemia |
| Amebic meningitis | SAH |
Gram stain is an invaluable tool in suspected bacterial meningitis. Gram negative diplococci are suggestive of N. meningitidis. Small gram negative bacilli may indicate H. influenza. Gram positive cocci are suggestive of S. pneumonia, Streptococcus or Staphylococcus species. Unfortunately, up to 20% of gram stains may be falsely negative as there are not enough organisms to see.
A review of the CSF values in common disorders shows:
Study |
Bacterial Meningitis |
Viral Meningitis |
SAH |
| Opening Pressure | Often elevated | Often elevated | Often elevated |
| Appearance | Clear to turbid | Often clear | Clear to bloody |
| Xanthochromia | Negative | Negative | Often present |
| RBC's | <5 per mm3 | <5 per mm3 | >50 per mm3 |
| WBC's | Elevated. Many PMNs | Elevated. Many lymphocytes | Slightly increased |
| Glucose | Low | Normal | Normal |
| Protein | Elevated | Elevated | Elevated |
| Gram Stain | May show organisms | Normal | Normal |
Sensitivity and specificity of LP is high for bacterial and fungal meningitis, but is only moderate for viral encephalitis, tuberculous meningitis, and spirochetal infection.
Sensitivity for carcinomatous meningitis is 50% on first tap and 90% if 3 separate taps are performed.
1). Thoennissen J, Herkner H, Lang W, et al. Does bed rest after cervical or lumbar puncture prevent headache? A systematic review and meta-analysis. CMAJ. 2001 Nov 13;165:1311-6.
2).Lavi R, Yernitzky D, Rowe JM, Weissman A, Segal D, Avivi I. Standard vs atraumatic Whitacre needle for diagnostic lumbar puncture: a randomized trial. Neurology. 2006 Oct 24;67:1492-4.
3). Armon, Carmel, Evans, Randolph W. Addendum to assessment: Prevention of post-lumbar puncture headaches: Report of the Therapeutics and Technology Assessment Subcommittee of the American Academy of Neurology. Neurology 2005 65: 510-512